Pages

Showing posts with label tutorial. Show all posts

Thursday, December 1, 2011

Up on the Rooftop Blog Hop


Welcome to the UStamp with Dawn and Friends!! Up On The Roof Top 2011 World Showcase Holiday Blog Hop.
If you have been following the Blog Hop from the beginning, you have just checked out Monika's fun Counting Down to Christmas card set.  Monika's project is a blast and I can't wait to involve my kiddos in the activities!  If you are just joining the Blog Hop, no problem, as you can start at any point. All the Designer's Blogs are linked together so you will be able to see ALL the FABULOUS projects we have for you.
My project is a Love and Joy Stocking banner. As soon as I saw the Stocking Builder Punch and coordinating Holiday Stocking Bigz die in the Holiday Mini catalog I knew that I needed to make a banner using them both.


Each stocking is unique just like the stockings our family has, each unique to its owner.  The letters sparkle right off of the stocking in person as they are coated with a few layers of Dazzling Details glitter glue.  Of course all things at Christmas need to be tied up with pretty bows, so each stocking is hung with care by a bow. 

 The ends of the banner are anchored with a shimmery snowflake poinsettia.  


 As a Special Thank You for stopping by my blog I am giving away BLOG CANDY!!
Please leave a comment about my project to be entered for a chance to win a great goodie bag of current Stampin' Up! products. I will randomly select a winner to be announced on Tuesday, so please check back to see if you are the lucky recipient!
AND there's MORE...LOTS MORE!!

  • You have the opportunity to get the downloadable PDF Tutorial for my project FREE!! It's a GIFT from UStamp with Dawn and Friends!! Woohoo!! See the blinkie below to access the FREE Blog Hop Website.
  • In the Spirit of the Holiday Season, you have the opportunity to get in on "Special Holiday Pricing" for the upcoming UStamp with Dawn and Friends!! SCORE!! Event. The Stampin' Up! Simply Scored Tool is HOT STUFF and SCORE!! will feature 40+ projects, all created using the Simply Scored Tool. SCORE!! is a MUST NOT MISS Event!! See the blinkie below to join and get in on the Early Bird savings.
And now for the most exciting giveaway of the season...
Everyone that joins the new and exciting upcoming event - SCORE!! - with "Special Holiday Pricing" will be entered into a Drawing to win 1 of 3 FREE Passes for an ENTIRE YEAR of UStamp with Dawn and Friends!! events!!
YES!!
You read that right!!
YOU could win a whole year of UStamp with Dawn and Friends!! events FREE!!

***Special Holiday Pricing of just $19.99 ends Dec 8th***

Winners will be announced on Friday, Dec 9th.
Click the Blinkie below to join SCORE!! with Special Holiday Pricing
and a chance to win a FREE Year of UStamp with Dawn and Friends!! events!!
Click the blinkie below and you will be taken to
THE UP ON THE ROOFTOP BLOG HOP WEBSITE!!


Of course it's ***FREE*** to join and
there you will find the tutorials for ALL the blog hop projects,
PLUS live chats, challenges and more prizes!!

You will even have an opportunity to be considered for a spot as a Guest Designer!!
Yes!! It is all FREE, so tell all your friends and
join the fun with UStamp with Dawn and Friends!!

AND last but certainly not least, it's time to hop on over to the next Designer's Roof Top, so please click the NEXT BLOG button, where you will find Caroline ready to share a delightful Holiday project with you.If you would like to hop back to Monika's Roof Top, please click previous blog.

Thanks again for stopping by and Happy Holidays to YOU!!

Oh and if you are interested in the Treat Boxes on the shelf above the banner, no worries all of the tutorials are still available in the I the Holidays!! session of Ustamp With Dawn and Friends!!
Pin It Now!

Friday, June 10, 2011

First EVER UStamp with Dawn and Friends!! Blog Hop - Brag Book


Welcome to the UStamp with Dawn and Friends!! World Showcase Blog Hop.
If you have been following the Blog Hop from the beginning, you have just been wowed by Beth's project. Wasn't it great technique??


If you are just joining the Blog Hop, no problem as you can start at any point. All the Designer's Blogs are linked together so you will be able to see ALL the super projects we have for you.


For my project I of course had to use my current favorite stamp set Fabulous Florets. (I hope I have not made you sick and tired of it already.)


This is a fun little brag book to tote around or even a mini scrapbook out of. The pages are made out of Stampin' Up!'s fabulous clear envelopes. You can just slip a picture into the pocket of the envelope or you can take it a step further and decorate the pages like you would a scrapbook. I love making these books and giving them to someone special makes them even more fun. I made this one for my 3rd child who is always amazed at her baby pictures. She is 4 now and will just love to get this book. Here is a sneak peak at one of the inside pages.

As a Special Thank You for stopping by my blog I am giving away BLOG CANDY!! Please leave a comment about my project to be entered for a chance to win a FREE PASS to the next UStamp with Dawn and Friends!! session - I ♥ the Holidays!! I will randomly select a winner to be announced on Monday, so please check back to see if you are the lucky recipient. If you have already joined I ♥ the Holidays!! for the Special Party Pricing and you are selected as the winner, you will get a FREE Pass to the NEXT event after I ♥ the Holidays!! which will launch in the Fall.


AND now for the really cool part!! You will NOT want to miss out in THIS!!
By clicking this really cute blinkie...yeah...go ahead and click it!!...
you will be taken to
THE WORLD SHOWCASE BLOG HOP WEBSITE!!
Of course it's ***FREE*** to join and there you will find the tutorials for all the blog hop projects,
LinkPLUS live chats, challenges and more prizes!!
You will even have an opportunity to be considered for a spot as a Guest Designer!!
Yes!! It is all FREE, so tell all your friends and join the fun with UStamp with Dawn and Friends!!

AND last but certainly not least, please hop on over to NEXT BLOG where you will find Gilda with another great project to inspire you.


Thanks again for stopping by!!
Pin It Now!

Friday, January 7, 2011

Sticky Note Holder Tutorial

I was so lucky, both girls are napping at the same time.  I actually had time to sit down and do the tutorial.  And they are still asleep so I can actually post it!  This is truly a rare occasion in my house. 
These are so quick and easy to create you are bound to have fun making your own.  Here are two new ones I made while putting this tutorial together.
 post it note(Of course I didn't notice when I was taking my picture that the pen is not pushed all the way in, but really it does and it it the perfect size for the holder.)POST IT NOTE2 After doing the tutorial using the blue cover above I tried sticking a “golf pencil” in and it slid right out, and that will not work in my bag, I need them to stay together.  I did make the dimensions a but different to accommodate the smaller pencil.  Then it was too small for a full pad of sticky notes so I just put in a half of a pad. 
Ok on to the good stuff, the Sticky Note Holder Instructions :
Supplies: Scoring Tool, Scissors, Adhesive, Cardstock cut to measure 3 ¼ by 7 3/8 inches,
clip_image002

Step 1: Score the long side of the cardstock at 3 1/8”, 3 ½”, and 3 7/8”. Burnish/crease the score lines to make them more defined and easier to work with.


clip_image004 


Step 2: Fold cardstock “in half” at the middle of the three score lines. Cut a line at about 1 ¾” from the folded edges and stop at the next score line. Cut another line at about 2 ¼”.


clip_image006


Step 3: (In this pic the 3 ½” side is on the left.) Apply glue in the first 3/8” scored area skipping the small part between the two cuts. Fold over to glue together.


clip_image008


Step 4: Pop out the pencil holder (since you didn’t apply glue there it should fold out.)
Attach a sticky note pad flush with the top fold. Embellish!


clip_image010


These instructions were based on a mini gel pen like the one in the picture.


clip_image012
If you want to use a golf pencil, I found that it slides out easily so I adjusted the dimensions.
Start out with a 7 by 3 ¼ inch piece of cardstock. Score at 3 3/8, 3 5/8, and
3 7/8 inches. Everything else is the same. It does make a smaller cover so I only used a half of a sticky note pad (50 sheets).


Since I had some rare extra free time I had a chance to make the tutorial a document you can down load right here!
Holder # 1
Stamps: Cute By The Inch
Ink: Night of Navy, Marina Mist
Paper:  Whisper White, Marina Mist, Night of Navy
Accessories:  Whisper White 1/4” grosgrain ribbon, Dimensionals
Tools:  Big Shot, Vintage Wallpaper Embossing Folder, 1 1/4” square punch, Scallop Square punch
Holder #2
Stamps:  Eat Chocolate
Ink:  Early Espresso, Riding Hood Red
Paper:  Peach Parfait DSP (from InColor Hostess DSP stack), Whisper White, Riding Hood Red
Accessories:  Riding Hood Red Taffetta (retired), Sticky Strip

Pin It Now!

Monday, April 26, 2010

Baby Blocks

          Right now I have a lot of friends and family members expecting babies, most of them are girls but there are a few boys thrown in the mix.  The other day I was moving my scrap fabric basket and spilled it.  A few extra pieces from my last rag purse fell out on the ground next to a soft baby block that my daughter left out.  I was instantly inspired.  I had everything I needed it was surprisingly easy to do.   I found the scraps I wanted to use and started running them through the big shot almost immediately.  I have several different ones cut and ready to be sewn together so here are the first two that I have done!

  GIRL blocks

4blocksAs you can see I made two different versions, one with the scalloped edges showing and one with straight edges.  I just stuffed these with fiberfill.  I contemplated going to the fabric store and getting some of the thick foam stuff but I had some baby rattles that I decided to stick in so I just went with the fiberfill.  The foam would produce a stiffer more square shaped block.  Each block uses only 6 of the scallop square dies cuts.  To create a set of 4 blocks I used about a 5 inch strip of 3 different fabrics.  (2 scallops in each fabric design)  This is really the perfect project to use up scraps!

Directions for a scalloped edge block:

scalloped


1. Lay out 5 of the squares to form a “T” to figure out your placement of each fabric design.

layout of squares


2. Sew the pieces together along the square in the center with wrong sides of fabric together.  (I made about a 1/4 inch seam which was just below each scallop.)  scalloped t


3.  Fold the flaps up and sew the sides (again with wrong side of the fabric together).scalloped box


4.  Sew the 6th remaining scalloped square along the top of the block.  Make sure that you do not sew it all the way shut so that you stuff it.  Fill it with fiberfill or foam to the desired firmness. scalloped openening


5.  Sew the opening closed.  (I had to hand stitch it closed because it was too thick to fit in my machine.)  And viola, your block is done!scalloped


Directions for straight edged block:

straight


1. Lay out 5 of the squares to form a “T” to figure out your placement of each fabric design.layout of squares


2. Sew the pieces together along the square in the center with right sides of fabric together.  (If you make your seam about 1/4 inch it should just incorporate the whole scallop so there are not any little holes when you flip it right side out.)  straight t


3.  Fold the flaps up and sew the sides (again with right side of the fabric together).straight box


4.  Sew the 6th remaining scalloped square along the top of the block.  (I forgot to take a picture of this step, sorry.) Make sure that you do not sew it all the way shut.  

5.  Right now your block should be inside out, turn it right side out through the hole that you left open.  Fill it with fiberfill or foam to the desired firmness. straight opening

6.  Hand stitch the opening closed and your block is ready for some fun.straight


Aren’t these fun!  As you can see I took it one step further with the butterfly block set.  I used the Stampin’ Up! exclusive Beautiful Butterfly Bigz Die and sewed/appliquéd butterflies on to the green panels for some added fun.   Now I need to buy the alphabet and number dies so that I can make some large dice for the kids to play with,  make ABC block for them to spell, oh there are so many possibilities.   My have already had fun playing with these ones before I had to confiscate them since these ones are a gift.  Now go find some fabric and get creating!  I have one more simple big shot fabric project to show you tomorrow, that is just as fun and even simpler!  Oh this is so much fun!

Tools:  Big Shot, Stampin’ Up! Scallop Square bigz clear die,   Stampin’ Up! Beautiful Butterflies Bigz die

Pin It Now!

Saturday, May 23, 2009

Clouds and Classic Ink Embossing

Sorry, I thought I would get a minute or two in the morning to hop on the computer and finish up things to post the video yesterday, but that didn’t happen.  I was running around trying to make sure that we had everything we could ever possibly need (yet never use) to spend the day at Discovery Kingdom.  Well I now have the video uploaded to YouTube and so here it is for your viewing pleasure.

Supplies used in Video are:

Stamps:  Upsy Daisy Stamp set

Ink: Versamark, Brocade Blue and Rose Red Classic Inks

Paper:  Whisper White and scraps of what ever

Accessories:  Clear Embossing powder

Tools:  Sponge and Heat Tool

Have a Stamperific Day!

Pin It Now!

Monday, April 6, 2009

Big Shot Tip

I have been asked by two different people on how to use the texturz plate on the front of a card base like seen in this card here, so I figure that there are probably more out there struggling too.  I am glad to know that I was not the only one who struggled to figure it out through much trial and error.  I even still have all of the messed up card fronts to prove it. (If you have messed up ones don't throw them away, you can use it for layers on a card!)  My allergies are pretty bad today so I am not going to do a video so you don't have to hear me sniffing and my yucky scratchy voice, but I have some pictures for you.

Start with your multipurpose platform open to tab 1.  Then if you want to use a shim now is the time to place it in your sandwich.  (A shim will make your stack thicker and give you a deeper impression.)  Next you want to line up the score line or fold line for the card along the edge of your texture plate.  You want the front of your card facing down on the texturz plate like this.tip1

Now you would carefully place your silicone rubber pad on the stack also lining it up with the score line in the card.  Top it all off with the impressions pad.  Then feed the stack through the bigshot so that the backside of the card that is not being embossed goes through first.tip2If you lined it up with the score line you will have a perfectly embossed card front! tip2 resultThis is the way not to do it, the way I tried the first 7 or 8 times.  The silicone rubber has a tendency to squish and slide/walk/shift, what ever you want to call it.  It just doesn't stay in the same exact way you put it but that is part of what makes the embossing work, it has the “give” in it.  I tried using removable adhesives and all sorts of things with no luck until I switched it around and did it the way shown above.  This it the way not to do it.  Do not have the cardstock sticking out the back of the sandwich!tip3Trust me this is what you will get if you do, it isn't so pretty. tip3 result


Supplies:  Big Shot Machine, Multipurpose Platform, Silicone Rubber, Impressions Pad, Stampin’ Up! Backgrounds #1 texturz plates, SU! cardstock

Pin It Now!

Wednesday, March 11, 2009

Ribbon Roses, the how to!

The ribbon roses are so pretty and so easy to make that you too can stun your friends with these pretty creations.  I taped a video last night on how to make these.  My 3 month old was up and in her little bouncy chair right next to my table and she thought I was talking to her so hopefully you can understand everything I say with her talking in the background. 

Supplies used in the video.

Pacific Point Striped Grosgrain Ribbon, Certainly Celery Twill (SAB bundle), and Glue Dots

Have a Stamperific Day!

Kirsten Brown

Pin It Now!

Wednesday, February 11, 2009

Thinking of You

I love, love, love the new stamp set Thoughts and Prayers.  I have the perfect idea for the matching decor element tree, the only problem is that I would have to move.  I want to take the large tree and put it on a wall and put old family pictures of our ancestors around it to make a cool family tree.  Wouldn't that be neat?

image Well on to the card.  This was a fun and simple card to make.  I actually made this card on Monday and yesterday found out it was really similar to the color challenge posted on SCS.  I used Kiwi Kiss, Perfect Plum and Pretty in Pink.

Thinkofyou

Now here is my first attempt at a video.  It is to show how to use the Stamp-a-ma-jig, my favorite must have tool!  (Yes, Shalae,  this one was made with you in mind.)

I shot the video with my webcam but I haven’t figured out a way to edit it or add to it, so I will have to do some more checking on it.  Let me know what you think.

Thanks and have a Stamperific day!

Kirsten Brown

Stamps: Thoughts and Prayers

Ink: Kiwi Kiss, Perfect Plum

Paper:  Kiwi Kiss Patterns DSP, Whisper White, Pretty in Pink, Perfect Plum

Accessories:  Kiwi/Vanilla Satin Ribbon, dimensionals

Tools:  Eyelet Border Punch

Pin It Now!

Friday, September 12, 2008

Circle Punch Scallops Tutorial


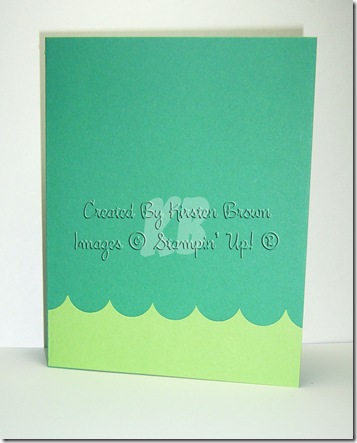
I have received many emails and comments on how to get your circle punch to make a scalloped border on my last post, so I decided to try my hand at my first tutorial.  The secret is that the patterend paper is not cut but the Not Quite Navy is. 

So here goes.....

1

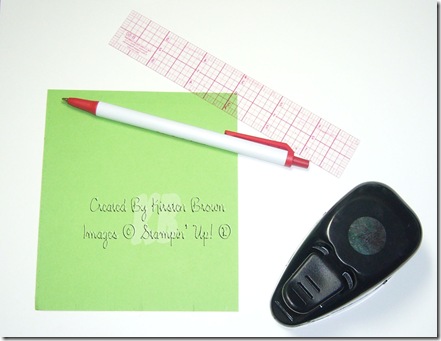
Supplies:  Circle Punch (any size, here I used the 3/4 inch circle) , Ruler and cardstock or paper that will be "peeking out of the bottom of the scallops"

2

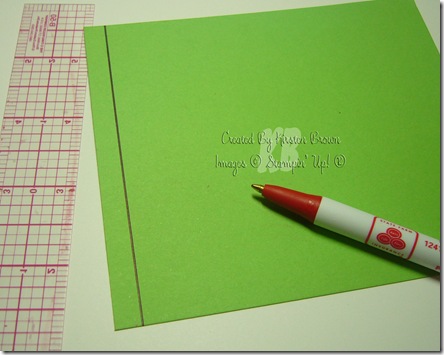
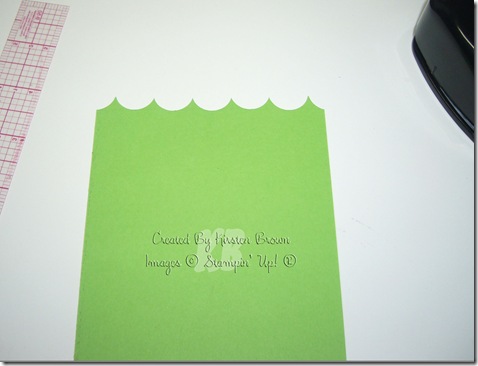
Draw a line that will help you line up your punches.  For the 3/4 inch punch I draw my line at 1/4 inch.  Generally I like to do about 1/3 of the size of the punch to make my scallops.  I usually draw in pencil and erase it, but it will be on the back of your card so it won't show anyway.

3

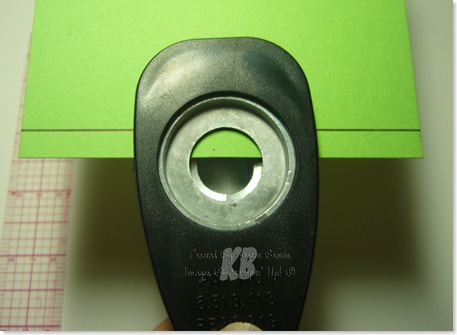
Eyeball it and line your punch up in the center of the cardstock.  (This way your scallops will be roughly the same on both the left and right sides, if you want to be exact you can always mark the center where you want to start punching.)  It is hard to see from this picture but you want to line the top of the punch up with the line that you drew.

4

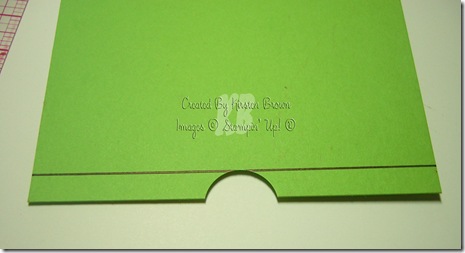
This is what your first punch will look like.

5

Then you just keep punching on both sides lining your punch up with the cut next to it and the guideline on the top.

6

Cut your cardstock to the size you want and attach it to your card!  Easy Peasy Mac and Cheesy.

I discovered this while looking through some scraps of paper and I had a sheet of paper that had circles in a row that kept getting caught up on the other sheets in the folder.  So I ripeed the top half of the circles off and was left with something that looked like scallops when I put it back with the other papers in the folder.   I hope that this was helpful, if you have any other questions about it, just let me know.  Also if there is anything else I have done that you would like to see pictures of how to do it, just let me know.  I will either direct you to where I got it from ( I am all about giving credit where it is due) or make another tutorial for you!

Pin It Now!