Pages

Friday, August 29, 2008

Halloween

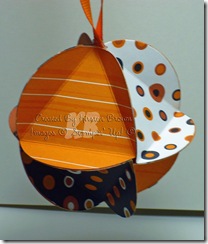
It feels so weird getting ready for Halloween already given it is just the end of August, but I have a class at the beginning of Sept and in order to get all of the upcoming holidays in we have to start now.   I was cleaning and organizing the freezer today (it was a hot day today and needed to do something cool), and hate to admit how long it has been since I have done that.  In the back of the freezer I found a bag of last year's Halloween candy and in it were a ton of the mini Reeses peanut butter cups.  I remembered bookmarking the cutest little treats from Debbie Olson's blog that I knew I had to make.  They are so cute, they use the basic templates from the nugget boxes, I ended up shortening my boxes by 3/8 of an inch to make them fit snugly.

pb cup box single pb cup

The little cups are decorated with an image punched with the 1 inch circle punch layered on a colored 1 1/4 inch circle punch.  I loving the new in colors this year.  I really like the Tangerine Tango, and Kiwi Kiss with Elegant Eggplant for Halloween themes.  Just a few more days until I am going to place my first order from the new catalog, the wait has been difficult and long, but because of that I didn't have any matching in color ribbon.  So I used the striped pumpkin pie ribbon and it coordinates wonderfully.  I hope you enjoy!

Stamps:  Batty for You

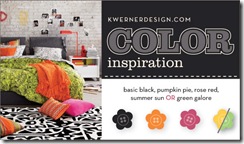
Ink: Black, Kiwi Kiss, Tangerine Tango, Elegant Eggplant

Paper:  Kiwi Kiss, Tangerine Tango, Elegant Eggplant, Whisper White

Accessories:  Pumpkin Pie striped grosgrain ribbon

Tools/ Punches:  1 inch circle punch, 1 1/4 inch circle punch

Pin It Now!

Thursday, August 28, 2008

Build a Brad Bracelet

Ok so I hope that this post shows up ok. This is the first time that I am setting up something to autopost to my blog and I hope it works. Today is going to be a busy day and I wanted to make sure to get something up today.

So a while back I finally found some of the chain that people were using to make their own bracelets with Stampin' Up! supplies. Now that was probably almost 2 months ago. Just recently I finally did something with it! I couldn't believe how easy they ended up being.

Bracelet

Unfortunately I gave away my first bracelet and after my class I was out of the pewter eyelets, yet I wanted to make one for me so this bracelet is two toned. I used the brass build a brads with the Bella Rose dsp. I got the instructions to make this from Patty's blog here. Hope you enjoy.

Paper: Bella Rose Designer Series Paper

Accessories: Circle Rhinestone Brads, Antique Brass Build a Brad

Tools/ Accessories: Crafter's Tool Kit

Pin It Now!

Wednesday, August 27, 2008

Stamping Therapy

Wow things have really been off for me over the past few days so I haven't been stamping and I think that made things even worse.  It is amazing that stamping can be such a therapeutic release for me.  (Well that is if I am stamping just for fun for me, when I know I am doing it for a specific project, assignment, swap or the likes it too can be stressful but still fun at the same time.)  Lately I have really enjoyed doing sketch challenges, as it the sketch or layout of the card is what takes the most of my time and a lot of these wonderful creations from others have really helped me out.  So tonight's card is a combination of the Color Combo (CC181) Challenge and the Sketch Challenge (SC191) from SCS for the week.  The colors were Rose Red, Kraft and Black.

sc191, cc181

It is cards like this where I wished we had a Kraft ink pad.  I really wasn't liking the combinations some of the other colors were giving me with the Kraft cardstock for the background.  Then I realized that I could in a round about way I could get Kraft.  The leaves images are stamped with Versamark ink and then embossed with clear embossing powder.  The only problem was that I was not able to find my embossing buddy so there was some stray powder when I embossed.  There is also paper piercing in each scallop on the black cardstock but it did not show up in the picture.  The dots on the center of the main flower have been colored with the rose red marker and had some rose pink glitter from the fine cosmo glitter set and the flower is popped up on dimensionals.  Hope you enjoy.

Stamps: Embrace Life

Ink: Versamark, Basic Black, Rose Red Marker

Paper: Rose Red, Whisper White, Basic Black, Kraft

Accessories: Dimensionals, 2-way glue pen, Fine Cosmo Glitter, Rose Red Brads, Kraft Taffeta Ribbon, Clear Embossing Powder

Tools/ Punches:  Scallop Border Punch

Pin It Now!

Friday, August 22, 2008

Time to play

While the two older kids were at school and the youngest napped I took some mommy play time.  For next months class I know that the ladies want to do something with a Halloween theme.  I have been trying to stay away from doing too many cards and to do more 3-d items.  I took out the 3-d circle ornament sizzix die and some retired Halloween DSP and just started cutting.   Here is what I ended up with. 

8 piece ball odd ball

The first one uses 8 of the circles and is the basic one that is pictured on the box of the die.  I know that I should be able to make bigger ones and tried using more of the remaining circles I had cut (14 of them I believe) and I didn't end up with a perfect circle.  I need to take the time to sit down and figure out the exact number of circles will be needed to make different sized ornaments so that they do end up looking like a circle or a ball.  But hey it is for Halloween when things are supposed to be odd right?  Hope you enjoy! 

Paper: Creepy Crawly DSP

Accessories: Pumpkin Grosgrain Ribbon

Tools/ Punches:  Big Shot Machine, 3-d circle ornament sizzix die

Pin It Now!

Thursday, August 21, 2008

I'm a bit rusty already...

and I cannot believe it.  It has only been a week and a day since I last stamped and boy did I get out of the swing of things.  When I sat down to stamp I needed some help in a major way, so I turned to Julee's Mojo Monday Sketch and also Kristina's Color Inspiration and combined the two into one card.  Here are their challenges.

Mojo49Sketch 082008-colorinspiration

For my "?" color for the challenge I chose Pacific Point, one of the new 08 In Colors.  I usually love black and white and ? cards but adding in the basic gray really threw me for a loop.  I had so many neutrals I constantly found myself reaching for another color to add in.  I did get over it and then found out that I am out of my basic gray taffeta ribbon that I was planning on using and I really didn't like the white or the black on the card so I ended up making my own Pacific Point grosgrain ribbon using a reinker and white ribbon.  It ended up drying a whole lot lighter than I had expected but it still works.  Hope you enjoy the card.

double challenge card

Stamps: Dreams du Jour

Ink: Black, Basic Gray, Pacific Point

Paper: Whisper White, Pacific Point, Basic Gray, and Basic Black

Accessories:  White Grosgrain Ribbon, Pacific Point Reinker, Stampin Dimensionals

Tools/ Punches:  Crafter's Tool Kit, Ticket Corner Punch, 1 1/4 circle Punch, 1 3/8 Circle Punch, Scallop Circle Punch, Heat Tool

Pin It Now!

Wednesday, August 20, 2008

I'm Back!

Thanks for bearing with me during my blog-cation.  I took a little break while the craziness of back to school took over life.  All of the last minute dental and doctors appointments etc so that the kids wouldn't have to miss school, and just spending the extra time with them.  The two oldest started school this week, I still cannot believe that my little man is in Kindergarten.  Ok so on with the good stuff, the stamping.

I needed a quick birthday project for me last class and decided that the little mint patty sandwiches and a container for them.  I know that I have seen these all over on blogs and websites but when I need to make one I cannot find the directions or measurements for one of the little baskets.  So I made my own basket that holds 4 peppermint patties. 

first sammy basket

This was so easy to figure out and the ladies loved it.  I will definitely be making these as favors for the kids birthdays.  This particular basket uses the retired Almost Amethyst Prints designers series papers (I have not ordered anything from the new catalog yet so I don't have any current papers, I am trying to hold out until the first so I can add some mini preorder sets on to it.) The basket uses the bitty birthday stamp set which has so many possibilities even though the images are smaller.  I hope you enjoy!

Stamps: Bitty Birthday Stamp Set

Ink: Black, Markers in Certainly Celery, Almost Amethyst, and Summer Sun

Paper: Almost Amethyst Prints DSP, Almost Amethyst, Certainly Celery, Whisper White

Accessories: Certainly Celery Brads

Tools/ Punches:  Scallop Circle Punch, 1 3/8 circle punch, 1 1/4 circle punch, crop-a-dile

Pin It Now!

Tuesday, August 12, 2008

5 in 1 Gift Card Purse

The 5 in 1 envelope template has been sitting in a drawer feeling neglected so I decided to pull it out and play.  I found lots of ideas for this little gift card purse on SCS made with the 5 in 1 envelope template.  Again I am using some retired Designer Series Paper, this one is called Dashing.

                                                           dashing purse

As you can tell I had a pretty hard time with the camera taking a picture of the striped paper but this is the clearest image.  I really need to learn more about my camera so that I can take better pictures.  Here is a picture of it opened up.

                                                     dashing purse card

In the inside there is a slider pocket for a gift card and then the bottom pocket holds a small card for your greeting or message.  To hold the card shut I put a small circle of Mono Multi Adhesive and let it dry so that it would work as a temporary adhesive, and I can open and shut the card with out damaging the paper!

Paper: Dashing Designer Series Paper, Real Red, Very Vanilla

Accessories: Real Red Brad, Real Red Grosgrain Ribbon, Mono Multi

Tools/ Punches: 5 in 1 card cover template, Small Star Punch, 1 inch circle punch, Slit Punch, Tab Punch

Pin It Now!

Monday, August 11, 2008

WoooHooo A Big Day in the Stampin Up World!


Not only is today the first day to order from the new catalog there are a few extra promotions going on right now!

First off, there is this fantabulous new Fall Winter Idea Book and Catalog filled with new wonderful stamp sets and beautiful papers and accessories.  I don't think that I have ever seen a catalog I have liked so much before.  I have been through the catalog several times making my wish list and it is so long I am really going to have to pick the best of the best for my first order as there is no way I can get it all.

                                                        us_fw_THUMB

Isn't it beautiful?  In real life there is a pretty scalloped edge to the right side cover of the catalog.  There are so many wonderful samples inside too of cards, scrapbook pages, 3-d items, home decor and everything in between.  You really have to see it to know what I am talking about.   If you would like your own copy of the Idea Book and Catalog please contact me (upper right side bar).

Second, the first one of the promotions being offered by Stampin' Up! is the Never Before Seen promotion.   From today August 11 through September 30th you can save 15% on 10 brand new stamp sets.  These are stamp sets that are new to the new catalog.  There is no minimum purchase or other strings, all you have to do is want one of the stamp sets and it is yours at a discount, how great is that?!

                                                        Never_Before_Seen_US copy

Now I may have saved the best for last.  The other promotion that Stampin' Up! is offering is some special demonstrator starter kits for only $99!  This special is available from today August 11-October 11 2008.  Yep you can become a demonstrator for half the price.  This is a great year to become a Stampin' Up demonstrator, it is the 20th anniversary and they are sure spoiling us.  There are 3 different kits available one is stamp focused, one scrapbooking focused and the last is decor elements focused.  There is a special bonus if you purchase the regular starter kit, you can add on a free stamp set on top of all of the stamp sets that come with the kit!  If you would like to find out more about the demonstrator opportunity please contact me and I would love to help you with any questions. 

                                   US_99_Start_Kit_promo copy

I am really looking forward to this year with Stampin' Up! it is bound to be a great one. 

Pin It Now!

Saturday, August 9, 2008

10 Minute Thanks

I needed a really quick thank you note and was able to pull this one out in under 10 minutes and most of that time was the planning aspect.  It is super easy and quick and boy will I miss the Much Appreciated stamp set.

                                                    Thanks

I have seen these flowers all over the place on other's blogs and stamping site and finally made some of my own.  They are just the scalloped circle punch and you cut a line towards the center at each indentation for the new scallop. 

Stamps: Much Appreciated

Ink: Chocolate Chip

Paper:  So Saffron, Wild Wasabi Prints DSP, Close to Cocoa Prints DSP

Accessories:  Dimensionals, Close to Cocoa button, linen thread

Tools/ Punches:  Boho Blossoms punch

Pin It Now!

Friday, August 8, 2008

Friends ~ The last of the refills

Ok, so I have been working on refilling my mom's cardbox that I gave her for Christmas, and I think that I am finally done.  These are the last of them and I can get going on stuff for me and even non card items.  Yippee!  Now don't get me wrong, I loved making these cards for my mom, but after making so many cards I am up for a little something different. 

Again, I am trying to use a lot of my supplies that are retiring or already retired.  I made several of these cards and here are two of them.

                                   friends

These ones came together pretty quickly.  I have several sheets of the SAB Love and Happiness Rub-ons left over and I have only used one of the friend designs so I had to figure out something that I could use them on. 

Stamps: none

Ink: none

Paper: Whisper White, Groovy Guava Prints DSP, Basic Black, Close to Cocoa, Berry Bliss DSP

Accessories: SAB Love and Happiness Rub-Ons, Black and Chocolate Chip grosgrain ribbon, dimensionals

Tools/ Punches:  1 1/4 circle punch, 1 3/8 circle punch, Scallop Circle Punch

Pin It Now!

Thursday, August 7, 2008

Be Yourself

So I am not feeling much like myself right now, I was just hit with a yucky cold that came out of nowhere, and I find the saying on my card to be a little ironic.  This card uses Kristina's Color Inspiration #18 as well as the SCS Sketch Challenge #188.  The colors, the design, the boldness well pretty much most of the card is not what I would typically create.  Here is the color challenge that we were given:             

                                                               080608-colorinspiration #18

So the colors are black, pumpkin pie, rose red and your choice of either summer sun or green galore.  I really am not a fan of green galore so I went with summer sun in my card.  I also ended up rotating the sketch challenge sideways because the saying I wanted as the focal point didn't look good going the other way.

                                                   Be Yourself

The black and white background is made by using one of the stamps from the Stitched Exotics Stamp Set stamped repeatedly in black.  The yellow patterns are from the Baroque Motif stamp set.  The saying from the Smarty Pants stamp set is stamped in pumpkin craft ink and embossed with clear embossing powder.  The edges of the focal point are sponged with pumpkin ink as well.


Stamps: Stitched Exotics, Baroque Motifs, Smarty Pants

Ink: Black, Summer Sun, Pumpkin Pie classic, and Pumpkin Pie Craft

Paper: Basic Black, Whisper White, Rose Red Prints Designer Series Paper

Accessories: Ribbon Slide from Pewter Hodgepodge Hardware, Pumpkin ribbon, dimensionals, Clear Embossing Powder

Tools/ Punches: Crafters Tool Kit, Heat Gun

Pin It Now!

Wednesday, August 6, 2008

Phone Notes

I have never really had anything by my phone to take down messages and notes when people call.  I am always scrounging around for bits of paper, and usually end up writing things on the back of envelopes, receipts and even napkins.  A week or so ago I started just putting a stack of cut of computer paper by the phone but it just kept getting bumped and going all over the place.  So here is my solution!

                                                          phone notes

I made this cute little box out of coasters.  You cant tell from this picture but it is 4 inches wide but only 1 1/2 inches deep.  I started making a regular box but decided it was too big so I cut the coasters using my handy dandy table top cutter that so far has cut through everything I have put in it.  So the side pieces ended up being 4 inches tall and 1 1/2 inches wide.  Then I just sanded down the edges to give them the same curves as the front and back pieces.  It is perfect to hold a stack of paper and a pen!


Stamps: Dreams du Jour

Ink: Wild Wasabi, Soft Sky

Paper: Wild Wasabi, Soft Sky, Whisper White, Wild Wasabi Prints Designer Series Paper

Accessories: Wasabi Stitched Grosgrain Ribbon, Dimensionals

Tools/Punches:  Crop-a-dile, Sanding Blocks, Ticket Corner Punch, 1 1/4 circle punch, 1 3/8 circle punch

Pin It Now!

Saturday, August 2, 2008

Best Friends

I really like the saying in the Garden Whimsy stamp set that says "best friends listen to what you don't say". It is a really great definition of a friend. These are some more swaps that I was working on. I had some newer stuff but my camera is not cooperating with the lighting tonight.


These were actually some swaps I sent to convention. I didn't plan very well and didn't end up having enough of any one color of accessory to add so I just had to make do with out. The butterflies are done using the rock-n-roll technique. There is some paper piercing underneath the saying to make it stand out a bit more.

Stamps: Garden Whimsy

Ink: Apricot Appeal, Certainly Celery, Elegant Eggplant, Black

Paper: Whisper White, Apricot Appeal, Certainly Celery, Elegant Eggplant

Accessories: None

Tools/Punches: Crafters Tool kit

Pin It Now!